The world is highly complex.
To operate in this complex world with self-driving robots, it would be hard to program all the tasks by hand, creating rules for every subtask and action. We humans can complete really complex tasks just by setting for ourselves the final goal for what we are supposed to do. For example, just by telling someone to “paint a wall”, they will know where to search to find paint and brush, how to hold the brush in hand, how to dip it in the paint can, and how to move the brush to eventually fill the whole wall with paint. It would be ideal if the robots could do this; complete tasks intelligently just by being presented with the final goal.
This is actually what research in deep reinforcement learning (DRL) attempts to accomplish. The ultimate goal is to create an intelligent computer program, an agent, that learns autonomously to operate in a new world just by using a reward system based on its actions. If the agent reaches the goal we want it to accomplish, we can give it positive rewards, and negative rewards for actions which are undesirable. The agent performs these actions based on the current state of the world, which could be for example, simply just the image received from the camera. So all in all, the agent gets states and rewards from the environment and takes actions based on these. The learning process itself is based on neural networks.
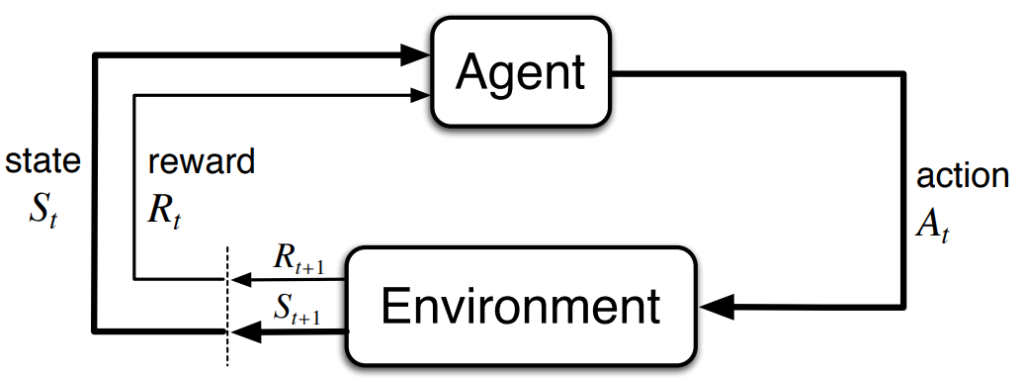
Overused diagram of an agent and environment interaction. (Source: Reinforcement Learning -book)
There has been evidence that reinforcement learning could be the right way to implement artificial intelligence. Reinforcement learning agents have accomplished some great milestones, such as being able to play Atari games, beating the world champion at the game of Go and mastering the complex game StarCraft. But what do games or more so video games have to do with robotics? The common aspect is that the setup is still the same: we have states, actions and rewards. Now we just operate in a 3D space rather than the 2D space of video games.
If you want to get more familiar with the whole topic, I suggest you check out this great book from Richard Sutton and Andrew Barto.
Setting up the Gazebo for Reinforcement Learning experiments
Preparing the world
Setting up Gazebo with ROS for deep reinforcement learning can be challenging, as there are many things you should implement and take care of. Instead of giving here a fully detailed guide on how to do it, we will present an overview of how we did it and provide more materials which you can follow if you wish to implement something similar.
The first thing you should implement is the Gazebo world and the task you want to work with. We wanted to test RL algorithms for collision avoidance, so we took a model of a bridge and put our robot at one end, and a goal at the other end. Pretty simple, right? But not as simple to solve for a robot which knows nothing about the world, nothing about how the camera image can be understood and nothing about how it can move with its actions. We will later add moving objects on the bridge to further make our task more difficult.
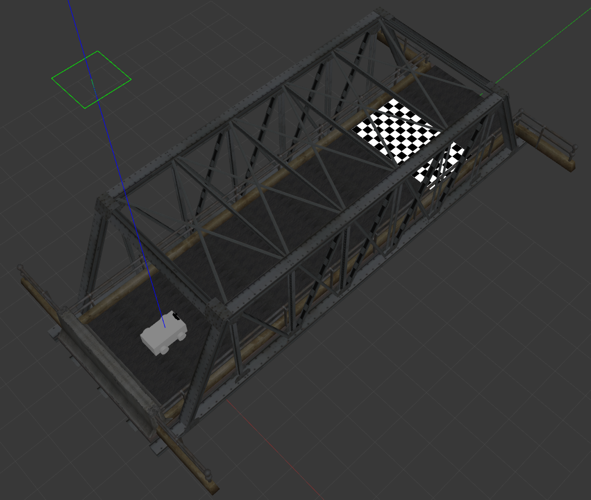
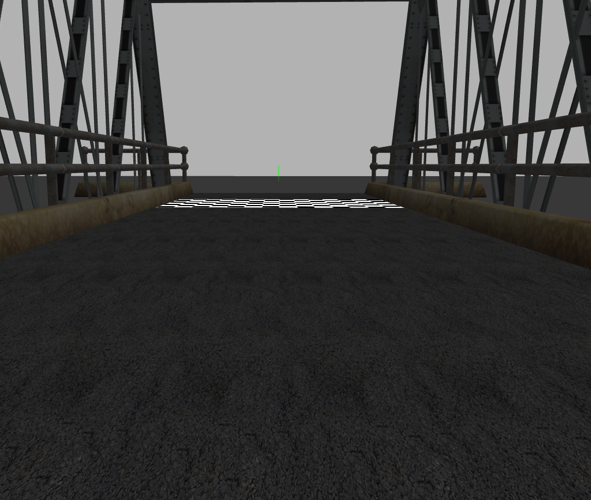
Overview of the Gazebo environment and image from the robot’s point of view.
You should note that the amount of objects in Gazebo should be minimal. Many RL algorithms require millions of steps to be taken in the simulated environment, so we want to run the simulation as fast as possible. Large objects can drop the fps notably. Physics for our robot should be defined also quite accurately, as the robot will explore all the different actions in the given world. Because of the physics issues discussed in previous blog posts, we had to move from the Planar Move plugin used for holonomic mode, to Skid Steering Drive.
Another thing you should keep your eye on is how your world is saved if you use the Gazebo GUI for creating it. We did this instead of defining the world directly in .sdf format, which caused problems when Gazebo simulation was reset. Weirdly, the world could be reset and the objects stayed in their places, but still the robot could fall from the middle of the bridge, as seen in the video below. So in a way, the objects actually were in the wrong positions, but looked normal. This was due to <state>-tags in the file, which were automatically added by Gazebo. They are used to save certain object positions in the Gazebo world with respect to simulation time, which is why the resets did not work as intended. Just by removing these state transitions and repositioning the objects, the issue was solved.
When Gazebo saved the world with <state> -tags, the world resets did not work as intended, making the robot fall from the middle of the bridge.
OpenAI Gym environment
When you have your Gazebo world ready, next you should implement an OpenAI gym-environment for your task. Using reinforcement learning algorithms is really straight-forward, as you can then use all the ready implementations such as stable-baselines and Keras-RL. Instead of an ordinary environment class, you should have three separate environment classes:
GazeboEnv – The Class which handles communication with Gazebo and deals, for instance, with resets, pausing the simulation and closing it. It is always the same, not task or robot dependent.
RobotEnv – Inherits GazeboEnv. Handles robot-specific functions, such as how the robot is moved and how sensor data is read.
TaskEnv – Inherits RobotEnv. Handles task-specific functions, such as when reward is given, which actions are available and when the episode ends.
You can find ready-made implementations for GazeboEnv and templates for the other two classes from openai_ros repository.
One problem we had with the default environments was how the simulation reset was done. Every time it was reset, the odometry topic would stop publishing for some weird reason. How we fixed this was just by changing reset_world_or_sim parameter from “SIMULATION” to “WORLD”. Also the physics are reset by default on launch, which caused our robot to lose its ability to move. Changing start_init_physics_parameters from true to false can be a good thing for you to do if you experience similar issues.
Rewards and episode ends
Controlling the robot and getting sensor data can be implemented rather simply with Python using ROS topics. Wait for an action from the neural network, define what it means in terms of linear and angular velocity, and then publish it to a motor control topic. But how can you specify when the robot is given rewards and when the episode is supposed to end?
First thing that came to my mind was to use coordinates acquired from Gazebo. If we are in certain coordinates, we know that we have reached this desired position and give a reward to the robot. But we quickly realized that this does not work well if we want to for example detect when the robot collides with something. We would need to apply tf-transformations to check for example, if just our left wheel is touching the finish line. And we would need all the different end-coordinate points of the object we do not want to collide with. Things could get messy really fast with this approach, so we thought there has to be a better way to do this.
And there is in the form of the Contacts plugin (also called Bumper). With this plugin, it is possible to detect for each robot part which objects are touching it. We can detect individually for the robot base and each wheel if they are touching the bridge, beton jersey or the goal line. The bridge was defined as a single collision variable, so to spot the difference between the bridge floor and the sides, we added an asphalt layer on top of the bridge.
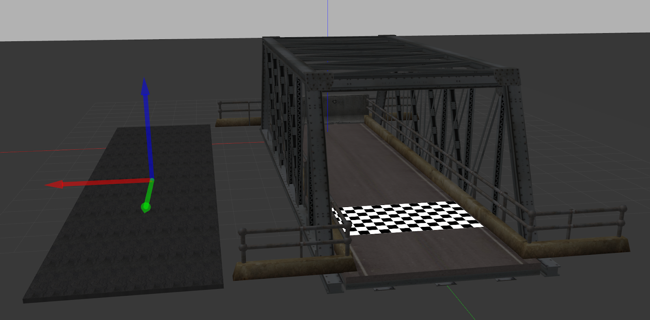
Adding asphalt planar on the bridge allows the robot to separate side collisions of the bridge from the floor collision.
There was this one bug with the contacts plugin that gave us a headache. We could use the plugin, see the corresponding ros topic for it, even the timestamps were correctly published, but there was no information about collisions being published. We found a solution from this video made by The Construct. In short, the problem is that the namespace of the actual and final collision variables are not the same as seen in the .xacro-files. When gazebo_ros package is used with spawn_model, the .xacro file is first automatically converted to .urdf and finally to .sdf format. This causes the issue with incorrect variable names. You can manually generate this .sdf file by running these commands:
> rosrun xacro xacro --inorder [FILE_NAME.urdf.xacro] > check_contacts.urdf

> gz sdf -p check_contacts.urdf > check_contacts.sdf
So we followed the instructions on the video by creating a .sdf file of our robot, checked from it the correct variable name, and added it inside <collision>- tags in .xacro file. Without knowing this, you would think that variable name needed was something like robot_base_footprint_collision, but for example for us, the final solution looked like this:
<contact>

<collision>robot_base_footprint_fixed_joint_lump__robot_base_link_collision_2</collision>

</contact>
With this fix, everything started rolling perfectly. We could now see when the robot collides with walls and when it reaches the finish line. This gave us the possibility to set negative rewards for touching the walls and positive for reaching the goal, and then end the episode when required.
Final optimizations
From the reinforcement learning point of view, the thing that matters most is how fast you can run your environment. A good property of Gazebo is that it can run faster than real time in simulation. There are two important parameters which affect the simulation speed and by default look they like this:
<max_step_size>0.001</max_step_size>

<real_time_update_rate>1000</real_time_update_rate>
By setting real_time_update_rate to 0, we can run the simulation as fast as our computer handles it. The max_step_size specifies the step size our simulation takes. Altering it speeds up the simulation, but is risky regarding the physics. We also noticed that if this value is being changed, the actions and images do not necessarily match each other, which is not wanted when doing reinforcement learning. The effects of changing this parameter would still require some further investigation.
The final thing you can do is to disable the GUI, which should also bring some increase to the speed. With this whole setup, we could run the simulation with ~15x speed. When the training algorithm was running, this dropped down to ~6x speed due to heavy calculations.
Robot taking random actions in the environment
As a summary, we now have a gym-environment for our task, which implements a framework between the Gazebo simulation and our RL agent. Our robot, the agent, gets a camera image from the environment, chooses an action based on it and receives a reward and the next image from the environment. In the next step we will continue to add moving objects to the environment and start testing different deep reinforcement learning algorithms for it.

