It happens in agile development, that you want to have some feature implemented and deployed, but at the same time for that feature to be available only for a special group of users or in a specific environment. Or you might want to enable it as a beta version and to be able to disable it after a short demo period. In such cases, the feature flags technique is a thing to try. The idea is that you have a list of feature flags which you integrate into your code and after that you can manage the state of those feature flags without the need to re-deploy your application.
In Karelics Cloud, at some point, we faced the necessity to have an optional functionality – a special type of robot missions to be presented as a beta version for one customer only. So, we wanted to develop and deploy a new feature, enable it for a short period of time and then disable it. One way to go about this is creating a separate branch that can be deployed to a specific environment, but it is about resources, time, deployment etc, so we decided to try feature flags.
Luckily, we are using GitLab and it already has built-in functionality for feature flags based on Unleash service. But it turned out that there was no official Unleash library for Angular, and the community library was a bit outdated and had very basic functionality. So, the decision was made to develop our own Unleash client for Angular and make it available for the open-source community: thus the new NPM package @karelics/angular-unleash-proxy-client appeared.
Installation
Using the new Karelics package it is easy to integrate Unleash feature flags into your application. As pre-requisites, some feature flags should be created in GitLab, and an Unleash proxy should be ran and configured. The @karelics/angular-unleash-proxy-client can be installed from NPM and initialized with one command. Let’s go through installation process step by step:
GitLab feature flags
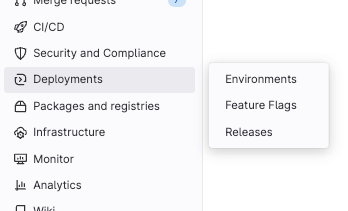
Feature flags management in GitLab can be found in project sidebar menu under “Deployments“.

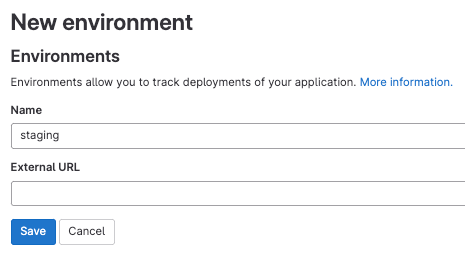
But before going to “Feature flags” check “Environments” section. If you already have some environments configured in your project just jump directly to “Feature flags”. If not – create at least one environment, for example “staging” (external URL can be left empty) or “production”. Later you will see that it will be possible to activate/deactivate some functionality for a certain environment. If you have no other plans on “Environments” except using them for feature flags you can “Stop” newly created environment after creation (it will be available in “Stopped” list then)

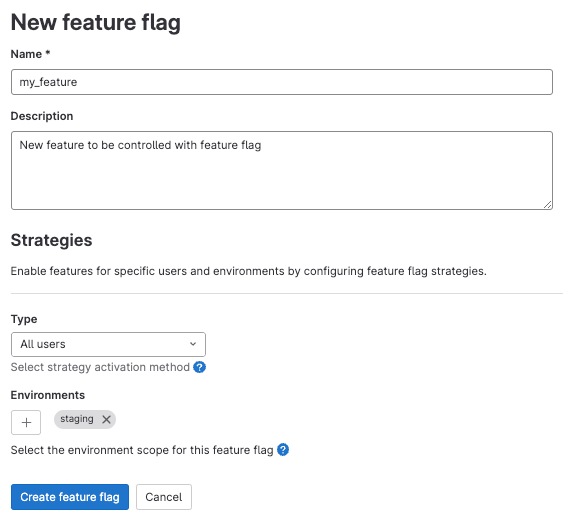
In “Feature flags“ section click “New feature flag“ button to create new feature flag.

Name– it is like an alias for your feature flag. It will be used later in your code to check the feature flag state. So use some short and clear value, as if you would name some variable in your code.Description– it will be visible only in GitLab, give an explanation what for this feature flag was created. When you will have many flags – it is useful to have some description to understand the need after a while.Strategies– define some strategies for your feature flag, for example stick it to specific environment. When you select some environment – this flag will be returned in that environment flags list. For other environments it won’t be available. Check GitLab documentation for more details about this or other strategies.
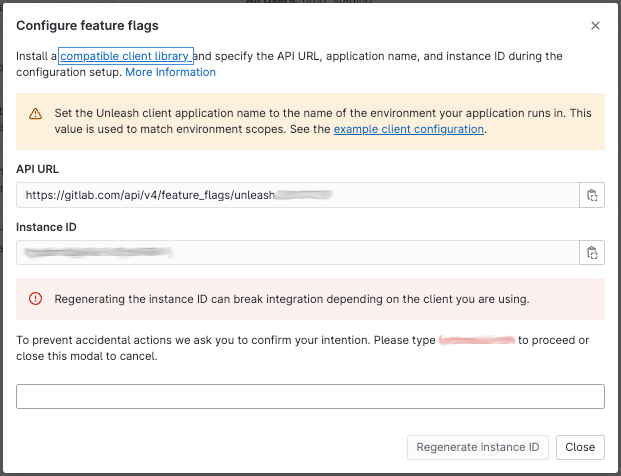
The last thing to do in GitLab before going to next step is to check the configuration parameters. Click “Configure“ button in top toolbar in “Feature flags“ section to open the following modal window.

API URL and Instance ID parameters are needed to configure Unleash proxy.
Unleash proxy
This is an important step, don’t skip it.
You can read more about the Unleash proxy on the official site. In short, it takes care about the communication with the Unleash server and gives an API for your application providing all necessary information about feature flags. The Unleash proxy can be run as a Docker container with the following command.
docker run \
  -e UNLEASH_URL=<API URL from GitLab> \
  -e UNLEASH_INSTANCE_ID=<Instance ID from GitLab> \
  -e UNLEASH_APP_NAME=<Environment name from GitLab> \
  -e UNLEASH_PROXY_SECRETS=<Random secret string to be used as "Client key" later> \
  -e UNLEASH_API_TOKEN=<not used for GitLab, but required - put any random string> \
  -p 3030:3000 \
  unleashorg/unleash-proxy
Alternatively, you can use a Docker compose file (docker-compose.yml) with the same configuration.
version: "3.4"
services:
  unleash:
    container_name: unleash
    image: unleashorg/unleash-proxy
    restart: always
    ports:
      - "3030:3000"
    environment:
      UNLEASH_URL: <API URL from GitLab>
      UNLEASH_INSTANCE_ID: <Instance ID from GitLab>
      UNLEASH_APP_NAME: <Environment name from GitLab>
      UNLEASH_PROXY_SECRETS: <Random secret string to be used as "Client key" later>
      UNLEASH_API_TOKEN: _
You can see parameters from GitLab configuration above are used to initialize Unleash proxy. A bit of a non-intuitive thing is UNLEASH_APP_NAME – here we are using the environment name created on GitLab (not the app name or something else). Also UNLEASH_API_TOKEN should be defined to run container, but it is not needed for GitLab, so you can use any custom string. Looks like it is some specific of GitLab integration with Unleash.
Unleash proxy client
@karelics/angular-unleash-proxy-client is an Angular wrapper for the official JS Unleash proxy client. Both are available in NPM, so can be installed with the following command in your project.
npm install @karelics/angular-unleash-proxy-client unleash-proxy-client
Client initialization should be done with provideUnleashProxy method put into providers list in AppModule. This method can also be used if you follow modern standalone components approach.
import { provideUnleashProxy } from '@karelics/angular-unleash-proxy-client';

@NgModule({
  providers: [
    provideUnleashProxy({
      url: 'http://localhost:3030/proxy',
      appName: 'staging',
      clientKey: 'MY_UNLEASH_PROXY_SECRETS',
    }),
  ],
})
export class AppModule { }
Minimal list of Unleash proxy client parameters includes:
url– where your Unleash proxy is running, with ‘/proxy’ path included.appName– value what was used forUNLEASH_APP_NAMEfor Unleash proxy. In case of GitLab it is environment name.clientKey– value should matchUNLEASH_PROXY_SECRETSenvironment variable value used to run Unleash proxy container.clientKeywill be sent inAuthorizationheader in requests to proxy, and Unleash proxy will use it to identify the client.
And that’s it. Feature flags are ready to be used in the application.
There is one limitation in Unleash client configuration important to mention (again some GitLab integration specific) – it is not possible to override environment (appName) in client configuration, environment (UNLEASH_APP_NAME) from proxy configuration will be used anyway. So, you define appName similar to UNLEASH_APP_NAME just for consistency. If you use another value for appName there will be no effect at all, everything will work in the same way.
Usage
After everything is installed and configured, the @karelics/angular-unleash-proxy-client gives plenty of ways to handle feature flags state.
Directives
You can use the *featureEnabled/*featureDisabled directive in the same way that Angular’s *ngIf is used, including else syntax to render alternative template in case the condition was not met.
<div *featureEnabled="'my_feature'; else disabledTmpl">enabled</div>

<ng-template #disabledTmpl>disabled</ng-template>

<div *featureDisabled="'my_feature'">disabled</div>
Guards
Specific router states can be protected from unexpected access with featureEnabled/featureDisabled guards with the possibility to define an alternative URL for redirect in case the condition was not met.
const routes: Routes = [
  {
    path: 'a',
    canActivate:[
      featureEnabled('my_feature'),
    ],
    component: AComponent,
  },
  {
    path: 'b',
    canActivate:[
      featureDisabled('my_feature', 'c'),
    ],
    component: BComponent,
  },
  {
    path: 'c',
    component: CComponent,
  }
];
Service
Finally, you can use UnleashService directly to handle the current feature flag state with isEnabled/isDisabled methods or subscribe to the feature flag state changes with isEnabled$/isDisabled$. The public unleash property gives direct access to the full functionality provided by native Unleash proxy client library.
import { UnleashService } from '@karelics/angular-unleash-proxy-client';

@Injectable()
export class MyService {
constructor(
private unleashService: UnleashService,
) {
// don't forget to unsubscribe
this.unleashService.isEnabled$('my_feature').pipe(
tap(...),
).subscribe();
}

methodA(): void {
if (this.unleashService.isDisabled('my_feature')) {
...
}
}

methodB(): void {
this.unleashService.unleash.updateContext(...);
}
}
Summary
Feature flags are a nice technique to deal with pieces of application functionality that should be enabled and disabled at runtime based on different conditions and without need to redeploy the application. Using the GitLab feature flags implementation based on the Unleash service and Karelics’ “Unleash proxy client for Angular“ it is easy to integrate feature flags in your application. @karelics/angular-unleash-proxy-client is fully open-source and we would be so glad if it could be useful for your projects. Contributions are highly appreciated!


